
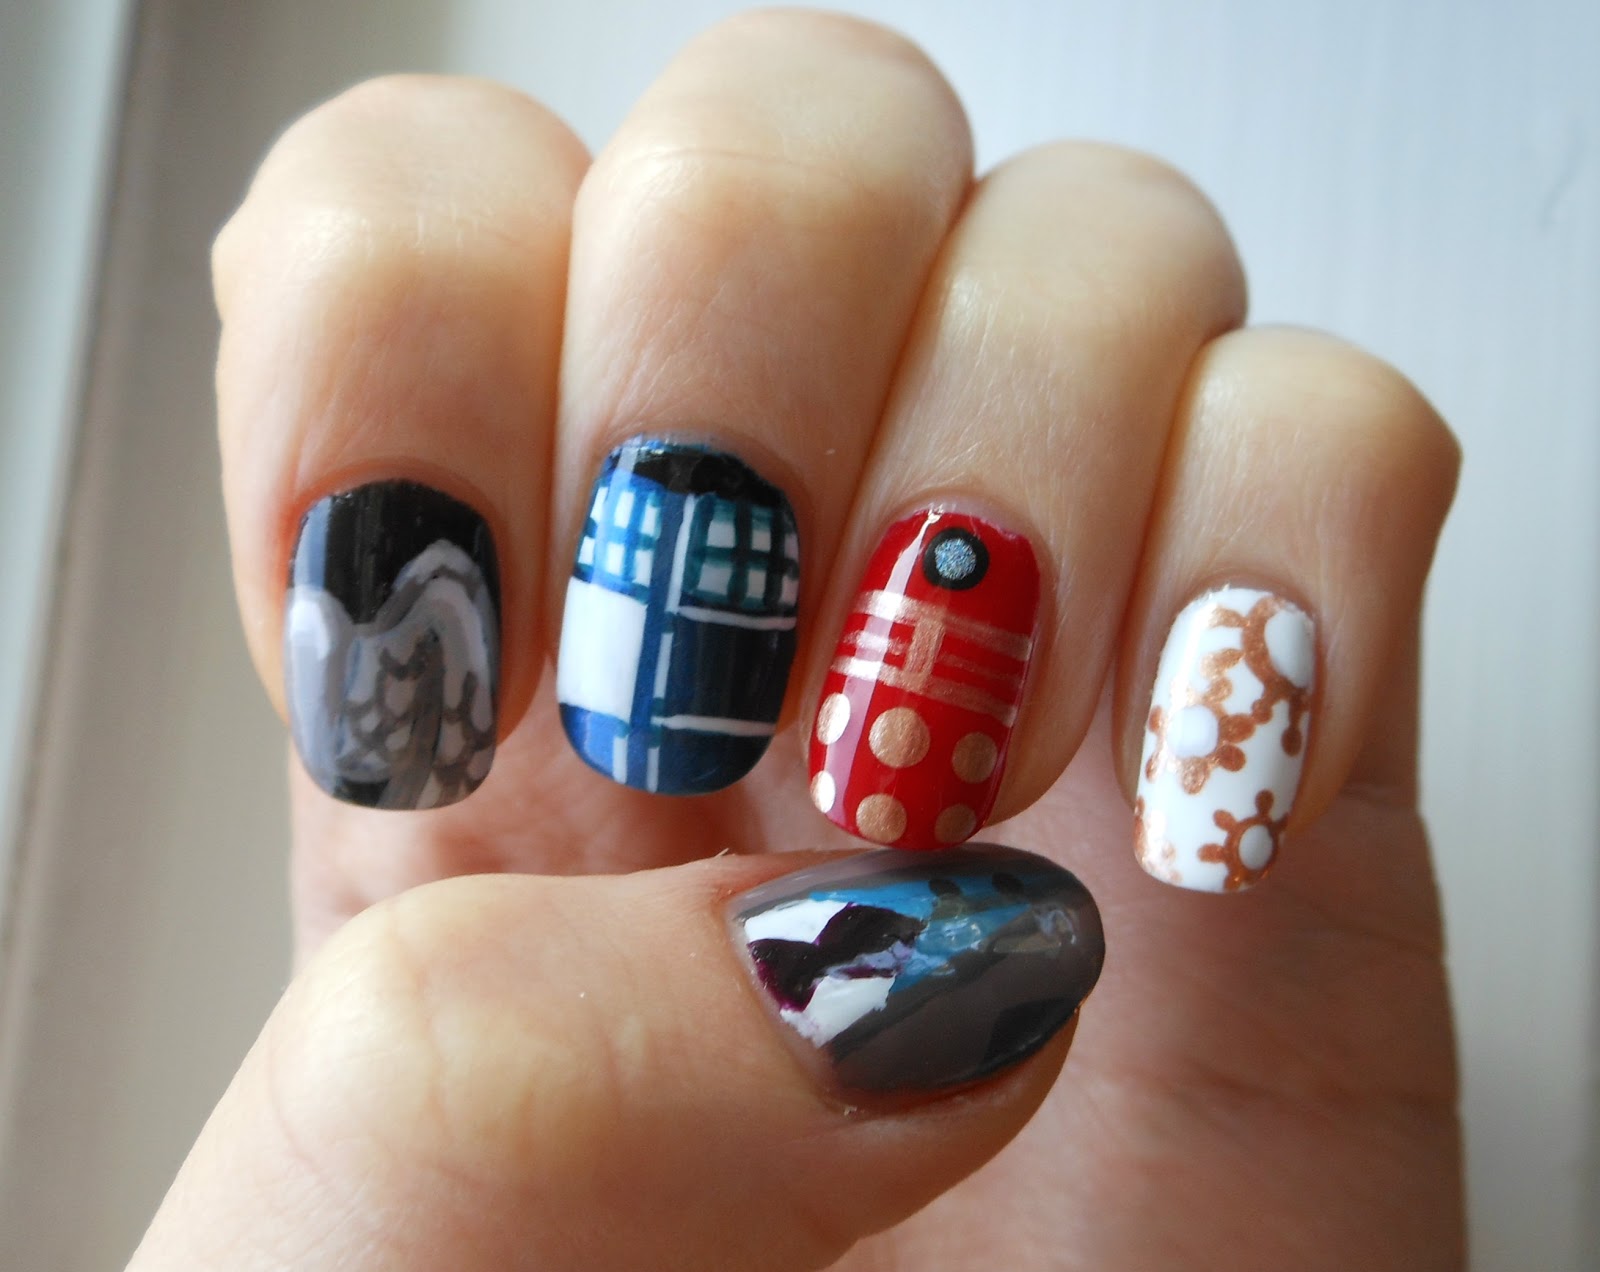
Hi guys! Hopefully you've all seen or heard of BBC's Doctor Who (the longest running sci-fi show in TV history!) If not, get to watching it ASAP- I'm looking at you, Netflix instant queue-ers. Anyway, today I decided to paint my nails with references to the show (more specifically, with references to David Tennant's run as the tenth doctor, since he's my favorite).


 Products Used:
 Pure Ice "Fast Lane", Nailtini "Bloody Mary", Essie "Blanc", Sally Hansen "Black Out", Kiss Nail Art Paint in black and white, O.P.I "Unfor-Greta-bly Blue", Mentality Nails "Elation" (I bought this polish from www.etsy.com), O.P.I "Berlin There, Done That".
These next polishes are the ones that I mixed together for the thumb nail design:

Urban Outfitters "Idaho Potato", Sally Hansen "Brisk Blue", O.P.I "Nein!Nein!Nein! Ok, Fine!", Essie "Sand Tropez", *Sally Hansen "Pat on the Black"
* I did not mix Pat on the Black with anything.
Basecoat: Orly Bonder
Topcoat: Seche Vite
Here's what I did on my right hand, if anyone is interested in modifying the design to accommodate for a weaker non-dominant hand:

Step 1.) Paint your nails as follows: pinky = white, ring finger = red, middle finger = slightly metallic deep blue, and index finger = black.

Step 2.) Follow the chart below to create the pinky nail design. These cogs are meant to represent both time and the creepy clock humanoids from my personal favorite David Tennant episode, "The Girl in the Fireplace".

Frame 1: Use large and medium sized dotting tools to randomly place gold dots on the nail. make sure that you have enough room between them to add cog details later on.
Frame 2: With the same dotting tools, place a slightly smaller dot of white polish inside each of the gold dots.
Frame 3: Use a smaller dotting tool and the gold polish to create the cogs.
Step 3.) Follow the chart below to create Daleks on your ring fingers:
Frame 1: With a large dotting tool, place a black dot in the center of the nail close to the cuticle. Once the black has dried, place a dab of a glitter or holographic blue polish in the center.
Frame 2: Use the same gold polish from the pinky design and a small nail art brush to make a horizontal line below the Dalek's eye. Then make a short vertical line perpendicular to the one you just made.
Frame 3: Paint another horizontal line that connects to the vertical one. Then carefully paint two more thin lines that stem from the center.
Frame 4: Use your large dotting tool and gold polish to dot a 3 X 2 grid of dots on the remainder of the nail. Those with shorter nails may want to use a smaller dotting tool, while those with longer nails could simply add another row of dots.
Step 3.) TARDIS time!
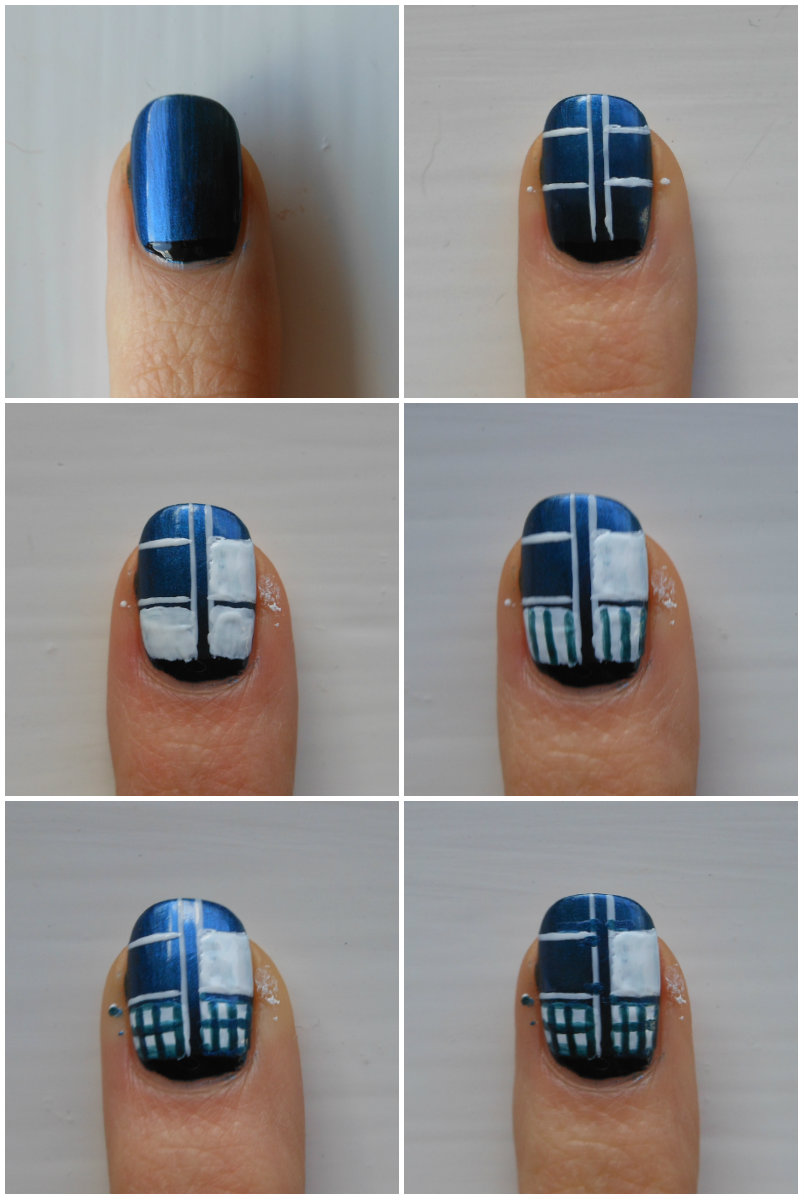
Row 1: With a black striper, paint a horizontal line close to the cuticle. Then use a white striper to paint two parallel vertical lines down the center of the nail. To complete the grid, paint four more white lines that run perpendicular to the vertical ones.
Row 2: Fill in three of the boxes that you've just created with white polish and a nail art brush. Be sure to leave a thin line of blue peeking through when you fill in the top two boxes. Then with a thin nail art brush and the same blue polish that you used to paint your nail, make three vertical lines on each of the two boxes closest to your cuticle.
Row 3: Next, cross the vertical lines with a horizontal one. Outline the edges of the boxes with blue polish to make them look more like window panes. Finally, touch up the white lines with blue. I decided that the TARDIS looked more realistic if the white lines didn't connect and looked more like highlights.
Step 5.) No David Tennant era nail art could be complete without a weeping angel to represent the super popular episode "Blink":

Row 1: Use a thin nail art brush and gray polish to create the outline of the angel. I recommend referencing a photo in addition to looking at my chart. In order to fit this design on my nail, I chose to paint just the shoulder and wing of an angel, but if you have longer/larger nails, feel free to make full bodied angels.
Row 2: Fill in just the shoulder with the same gray polish. Next, use either a lighter gray (or mix your mid-toned gray with white), to fill in the wing area and to create highlights on the shoulder and the arch of the wing.
Row 3: Use your thin brush and a slightly darker gray (I mixed my original gray with a tiny bit of black) to create the feathers. Be sure to start the feathers below the arch of the wing- any higher and they'll look like they defy gravity. And because I'm a perfectionist, I added an even lighter highlight on the very tip of the wing, as well as on the shoulder.
Step 6.) On your thumb nail, create David Tennant's brown trenchcoat, blue suit, and tie:

Row 1: Use a cool-toned brown polish to block off either side of the nail. These sections should be thinner towards the cuticle and then angle in until they're almost touching at the tip of the nail. Then with a muted blue polish, paint a V shape halfway down the nail and fill it in.
Row 2: With a darker, slightly olive color, outline the brown sections and make two sideways Vs near the edge of the nail to create the lapel of the coat. Then paint a thin dark brown line extending from the dip of the blue V. On one side of the line, use a small dotting tool to make two buttons. Next, fill in the remaining bare part of your nail with white and make a T shape with burgundy polish (For some reason I always picture the 10th doctor with a burgundy tie...)
Row 3: Make two diagonal lines extending from the cross of the T that meet up slightly above the middle of the white area. Lastly, make a diamond shape to finish off the tie.
Step 7.) IMPORTANT: Wait until each nail has had at least 25 minutes to dry before applying a top coat.
 Pure Ice "Fast Lane", Nailtini "Bloody Mary", Essie "Blanc", Sally Hansen "Black Out", Kiss Nail Art Paint in black and white, O.P.I "Unfor-Greta-bly Blue", Mentality Nails "Elation" (I bought this polish from www.etsy.com), O.P.I "Berlin There, Done That".
These next polishes are the ones that I mixed together for the thumb nail design:

Urban Outfitters "Idaho Potato", Sally Hansen "Brisk Blue", O.P.I "Nein!Nein!Nein! Ok, Fine!", Essie "Sand Tropez", *Sally Hansen "Pat on the Black"
* I did not mix Pat on the Black with anything.
Basecoat: Orly Bonder
Topcoat: Seche Vite
I hope all of you Dr. Who fans out there found this helpful- good luck!
These are awesome!!!
ReplyDeleteThanks!!
ReplyDeleteTHESE ARE SO AMAZING!! Oh my goodness! Thank you so much for posting this!
ReplyDeleteThese are great! I laughed when I read this because we share both the same favorite episode and Doctor :)
ReplyDeletethanks, fellow whovian!
Delete