
Sunday, March 24, 2013
Sunday, March 17, 2013
Nail Trend: Bright Half Moons S/S 2013
Hi everyone! Lately I've been feeling kind of stumped for nail art ideas, so the other day I did a search for this season's nail trends, and came across LOTS of bright half moon manicures (moonicures?) Most of the half moons were two-toned pastel yellows and peaches, with the moon comprised of the lighter color. Since I don't have multiple shades of yellows and peaches, I improvised with two shades of blue-toned purples, which are still in keeping with this season's vibrant colors.

This look is SUPER easy, and can be achieved with two colors of polish and some circular stickers.
Step 1.) Apply a basecoat and paint your nails with the lighter of the two polishes. Try to be extra careful when painting near the cuticles- this look is very simple, but can easily look sloppy if the polish application isn't perfect.

Step 2.) Next, use circular stickers to help make the half moon shape. A lot of people use paper reinforcement stickers, but I found these laying around the house and figured that they'd work just as well.


Frame 1: Once the lighter polish is completely dry, press a sticker firmly onto the nail. The highest point of the circle should be about 1/4 of the way down the nail. Before you move on to frame two, make sure that there are no gaps between the sticker and the nail.
Frame 2: Paint on one thick coat of the second color. Be sure to paint the free edge of the nail to ensure that none of the lighter color peeks through.
Frame 3: Immediately peel off the sticker. When doing this, carefully peel towards the tip of the nail instead of towards the nail bed (you're more likely to get a perfect edge this way).
Step 3.) Seal with a topcoat to extend the wear of your moonicure!
Products Used:

Urban Outfitters "Bandeau" and "Crowded"
Base and Topcoat: Orly Bonder and Seche Vite
Lastly, here's a sneaky end-of-post extra...
A BRIEF HISTORY OF MODERN NAIL POLISH
Okay, I couldn't resist- the fact that half moon manicures are popular again reminded me of the style that women wore on their nails when nail polish first became widely available. The nails were left bare on the tips and on the natural half moon shape of the nail plate, while the centers were painted with shades of rose, bright red, and coral.

I gave this 1920's/30's style a shot on my right hand:

Anyway, modern nail polish first got its start in 1920's France when makeup artist Michelle Menard came up with the idea of coating the nails in an enamel similar to automobile paint. Before, nails were stained red with various oils and waxes and then buffed to a shine.
While the idea of using an enamel instead of a stain was brilliant, the problem with automobile paint was that it was too rigid and flaked easily. A few years later, American brothers Charles and Joseph Revson had a similar idea that entailed using pigments in nail polishes instead of dyes. In 1932, the pair teamed up with chemist Charles Lachman to develop nail polish that is extremely close to what we use today.
The nail polish was marketed under the brand name "Revlon" (sound familiar?), which was created by replacing the "S" in Revson with an "L" for Lachman.

Aaaand that's it! Congrats if you made it to the end of this post- I get really excited and start to ramble a bit when it comes to cool historical things (well, they're cool to me at least). Have a lovely day!
Monday, March 11, 2013
Review: My Top 5 Favorite Nail Polishes
Hello lovely reader! Today I bit the bullet and decided to finally write a post about my five favorite nail polishes. As I suspected, it was pretty difficult to choose just five, so I ended up narrowing down my favorites by how much I use them, quality of the polish, and season. Therefore, all of the polishes that I'll be mentioning are in my opinion great versatile colors for Spring (except perhaps my thumbnail color), and are of excellent quality.

From L to R: O.P.I "Berlin There Done That", Illamasqua "Milf", Butter London "Two Fingered Salute", Butter London "Dahling", Essie "Pilates Hottie".
O.P.I Berlin There Done That

What it is: A midtone cool gray that dries to a creme finish
Price: I believe that O.P.I retails for around USD $8
Why I love it: First of all, I bought this polish on a whim whilst grocery shopping a few months back, thinking that it would be great for nail art, but not a great standalone color. Well, I was kind of right- this is wonderfully versatile, but it's also beautiful on its own. This is definitely not one of those grays that makes your fingers look dead (at least not on my skintone), and it dries quickly and reaches full opacity with 2 coats.

Illamasqua "Milf"

What it is: A springy mint green that dries to a creme finish
Price: USD $14
Why I love it: Well, obviously not because of the price, but if you can bring yourself to spend $14 on a bottle of polish, this is the one to spend it on. I imagine that it would be flattering on most skintones, and dries SUPER quickly. This is one of those polishes that I have to make myself put aside in favor of trying new colors because it's just so wonderful/luxurious/every positive descriptive word ever. Also, I've gotten tons of compliments when I wear this and never fail to be amused by peoples' reactions when I tell them that the color is called Milf...

Butter London "Two Fingered Salute"

What it is: A muted, dusty sea-green with very fine copper glitter shot through
Price: USD $15
Why I love it: If I had to give a most unique polish award, it would without a doubt go to this one. This is one of those polishes that never shows up as beautiful in pictures as it does in life, so sorry about that (the image of the bottle is as close as I could get to what it really looks like). Anyway, Two Fingered Salute has a ton of dimension and looks slightly different depending on the lighting, which I love. The shimmer spreads very evenly which is another plus, and the dry time is quite fast as well. You get what you pay for!

Butter London "Dahling"

What it is: A deep rose shade that straddles the line between red and pink (creme finish)
Price: USD $15
Why I love it: Personally, I think that this is the most perfect, timeless dark rose color ever. For a pink/red, it's quite easy to wear, meaning that I don't feel as though my nail color is out of place if I'm wearing casual clothing. I could also see this looking amazing on a member of any age group, simply because rose shades are classically glamorous and feminine. Butter London hasn't disappointed thus far!

Essie "Pilates Hottie"

What it is: A light pinkish lavender (creme finish).
Price: USD $8
Why I love it: Once again, this was another grocery store impulse buy, but this shade has become one of my most worn purples/pinks. It's pink enough not to wash out pale skintones, but not quite bright enough to scream Barbie (which isn't my thing, although I have no problem with bubblegum pinks on other people). Similar to Dahling, Pilates Hottie is quite feminine but also very elegant.

Well, that's it! I hope you've found this post helpful! I realize that most of these polishes are quite expensive, but I do use them often and they have proven to be worth the money. However, I plan to do a favorite drugstore nail polish post in the future!
Saturday, March 9, 2013
How-To: Sushi Nail Art
Hello again! Unsurprisingly, I got bored and decided to make today a nail art day... a sushi nail art day. Truthfully, I'm not a big fan of eating sushi, but it's just too pretty not to be commemorated with nail art!

Step 1.) Apply a basecoat to your nails and then paint on a coat of mint green polish (which for the purpose of this tutorial I'm calling wasabi green).

Step 2.) Follow the charts below to create the sushi. I've made three different sushi designs, so you can either use one design on all fingers, or mix them up as I've done.
California Rolls

Top row: Use a white polish to create a large oval that stops approximately halfway down the nail. I recommend standing directly over the nail instead of at an angle while you paint the oval to ensure that it's even. Next, use a black striper to carefully outline the oval. This will give you an opportunity to correct any jagged edges.
Bottom row: Use the same wasabi green polish from step 1 and a pinky/coral color to dab on the filling. I used a medium sized dotting tool and arranged the two colors in a circular shape, while leaving some of the "circle" white. Finally, use your black striper to shape the coral/wasabi colors into a more defined circle. This doesn't have to be perfect- you're just adding definition.
Red Caviar Sushi

Top row: With your black polish, make a basic tip that is slightly flatter across the top. Then, use a white striper to make a thick line on top of the black.
Bottom row: Use a bright coral red polish and a medium or large dotting tool to make a mountain of caviar (oooh, how luxurious). Since I don't own a coral polish, I had to mix together bright red, yellow, and a bit of white- this just goes to show that you don't need tons of colors to achieve a variety of nail art looks. Lastly, use a light pink shade and the same dotting tool to highlight the caviar beads.
Salmon Sushi

Top row: With white polish, paint the tip of the nail, but make the tip rounded and convex instead of concave. Then use a peachy/salmon polish to paint a thick section on top of the white. Don't worry if the salmon section is thicker on one side- I actually think this looks more realistic!
Bottom row: Wipe off most of the polish on a white striper, and then paint short little slanted dashes on the salmon section. Finally, use a black striper to paint a vertical band over the sushi. To give the salmon more dimension, curve the black slightly as you paint over that section, and then make the line completely straight once you reach the white tip.
Well, that's it! I hope you try out this design and have fun doing so!
Products Used:

Illamasqua "Milf", Butter London "Dahling", Sally Hansen "Black Out", Sally Hansen "Mellow Yellow", Nailtini "Bloody Mary", Essie "Blanc", Kiss Nail Art Paint in black and white.
Base and Topcoat: Orly Bonder, Seche Vite.
Saturday, March 2, 2013
Review: Illamasqua Speckled Nail Varnish
Hi guys! Today I went out shopping at Sephora to see if they had any new nail products, and saw that they were selling the new Illamasqua Speckled nail polish. Basically, I was ecstatic- I'd seen online a couple weeks ago that Illmasqua had released these, but had forgotten about them because, you know, life happened. Anyway, I picked one up in the color "Fragile" (a baby blue with black speckles), and couldn't resist doing a review for y'all.


Left: Super pretty packaging, Right: "Fragile" in the bottle.

I had to take a picture of the top of the package because for some reason I think it's really cute that even the color label is speckled...
Basic Info:These polishes retail for $16, and you can buy them at Sephora, http://www.sephora.com/speckled-nail-varnish-P377106, and on the Illamasqua website: http://www.illamasqua.com/shop/products/nails/
The speckled polishes come in four other shades:
"Freckle", a tan with black speckles
"Scarce", a muted peachy pink with black speckles
"Speckle", a lilac with black speckles
and "Mottle", a mint green with black speckles

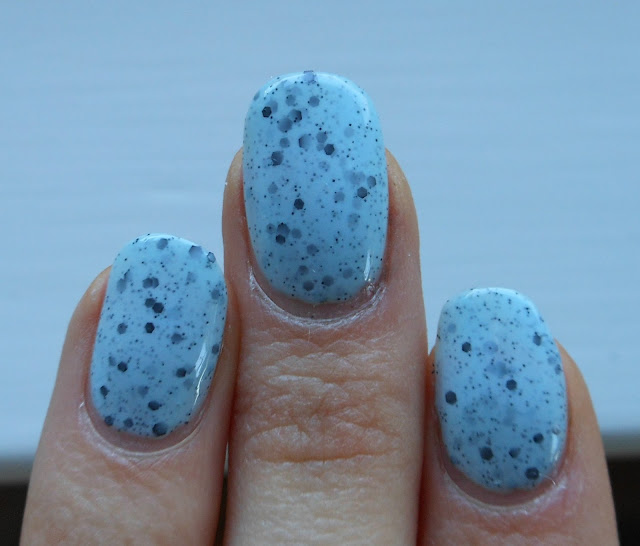
Above: My nails after one coat of polish. I was a bit skeptical of the sheerness of the base color after the first coat, because I thought it would take around 3 coats to build up the opacity, which is unusual for Illamasqua polishes. However, I was totally wrong:

After a slightly thicker second coat, the color was completely opaque (the picture above shows my nails after 2 coats + a topcoat). I love how the speckles from the first coat show through a bit- I think it gives the polish a lot of depth, and totally explains why the base is a tad sheer.
Other stuff that you may want to know:
Dry time: FAST. I was able to immediately apply a second coat after the first. This is pretty typical for Illamasqua polishes though, which half explains why I love them so much (superior pigmentation is the other reason).
Size of bottle: 15 ml (0.5 fl oz.)
Finish: This dried to a creme/matte-ish finish, and looks very glossy with a topcoat. Despite the fact that there are large hexagonal speckles, my nails are still quite smooth.

The Verdict:
Q: Will I buy more colors/repurchase?
A: Yes! I know that $16 is pricey for a nail polish, but I'm not aware of any dupes on the market, and the formulation is excellent.
Subscribe to:
Posts (Atom)